


I’ve been playing fighting games since I was a kid. Through the course of time, it’s become increasingly clear that I am OLD now.
I still very much want to play fighting games; my body just doesn’t work like it used to.
For starters, I’m much larger physically. The controllers that were appropriate in size for a kid at the time are much less comfortable for what are now comparatively gigantic hands. What was a comfortable shoulder width apart between the joystick and buttons on an arcade cabinet back then now feels absolutely cramped for two fully grown adults.
There’s also the general effects of aging. My wrists are less supple. My fingers are less accurate. Extended periods of play become gradually more difficult. My mental reflexes are still there, or so I hope, but my body can’t quite keep up with the pace that fighting games require.
What follows in the story of how I turned to a dual PS Access Controller setup to help relieve these issues. In the interest of full disclosure, I have not been paid by any party for the product review seen here but I am also not a medical doctor. Please consult with a professional if you are experiencing pain while gaming.
This particular tale begins in 2021 with the release of Guilty Gear Strive. I had become a huge fan of the franchise since I first discovered GGXX at EVO and excited to see them finally incorporate rollback net-code. I first bought the game on Steam and decided to learn it on keyboard using some HitBox inspired key bindings. My hope was that abandoning the joystick would help increase my precision with super moves while reducing stress on my wrists, and a new game was the perfect time to learn some new controls.
At first, I started with keeping my rebinds simple. I moved jump down to space per, put a dash macro on left-shift, then moved the attack options rightward so I could put “Dust” on right-alt to access it with my thumb easier. As I place I noticed several problems with this setup. First, I needed to remember to toggle my windows key off to avoid accidentally losing window focus with a stray press. Second, I kept losing my finger placement on my right hand. Finally, I noticed that my shoulders were sore after extended periods of play.
In order to address these issues, I rebound my right-hand keys closer to the numpad as diagrammed below:
![Paired photos of keyboards showing Guilty Gear Strive button assignments. The image labeled "Before" matches "Dash" to "left shift", "Left" to "A", "Down" to "S", "Right" to "D", "Up" to "spacebar", "Dust" to "right alt", "Punch" to "P", "Kick" to "[", "Slash" to "]", and "Heavy Slash" to "\". The image labeled "After" matches "Dash" to "left shift", "Left" to "S", "Down" to "D", "Right" to "F", "Up" to "spacebar", "Faultless Defense" to "right control", "Roman Cancel" to "down arrow", "Dust" to "left arrow", "Punch" to "delete", "Kick" to "end", "Slash" to "page down", and "Heavy Slash" to "numpad 4".](https://suburbanlion.com/wp-content/uploads/2026/08/ggst-keybinds-comparison.png)
This had several immediate benefits.
Placing my hands at a comfortable distance apart helped relieved the shoulder pain I had been suffering. Spreading out my buttons reduced stress on my fingers, and having the distinct tactile sensations of the nub on the “f” key and the space around the “delete” key made it easy to find the appropriate keys without looking. It also opened up new buttons for “roman cancel” or “faultless defense” using my right thumb and moving my left thumb closer the center of the spacebar made the key feel more responsive.
The problem with this setup? It worked a little too well…
Armed with a comfortable setup, my gaming sessions increased in both duration and intensity. As a result, the wear and tear on my keyboard gradually became problematic. I started going through keycaps at a troubling rate. I transitioned to using my old 2-player X-Arcade as a stopgap by assigning my left-hand keybinds to player 1’s buttons and right-hand to player 2’s buttons, but it wasn’t quite as comfortable. I was also getting frustrated with frame-rate issues on my aging PC, finding my self dependent on Daryl‘s “potato mod” in order to play competitively.
Enter Sony.
Let’s be real here. The decision to solve my controller problem was kind of expensive. Not only did I need to buy 2 PS Access Controllers to pull it off, I also needed a PS5 and second copy of “Guilty Gear Strive: Ultimate Edition” in order to use it. As of this writing, the PS Access Controller does not work on PC “out-of-the-box” but there’s some interesting code on GitHub.
Setting aside the console cost, the price of 2 PS Access controllers was comparable to an official HitBox — which were (1) in need to be modification if I wanted to maintain my left-pinky dashes, and (2) on back-order for months anyway. This also opened up the use of my PC(s) for my streaming and chatbot while doubling as a new media center for the living room. I wasn’t necessarily disappointed in the value.
The PS Access controller came with an assortment of button shapes that could be snapped on. Being an early adopter, I felt obligated to try them out myself. My initial set-up was shown below:
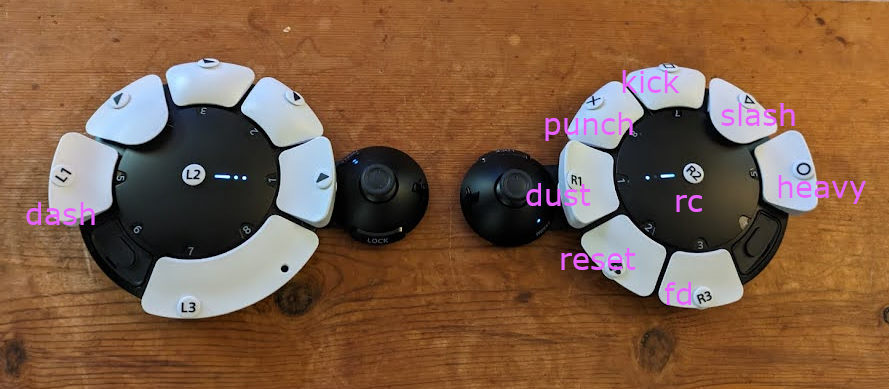
My original idea was to use the “curved-side” button where my thumb was for a tactile indicator and the “extended-inward” button for my pinky so I didn’t need to reach as far. I intentionally unbound the bottom-outer buttons to provide a safe palm rest, but soon discovered I needed them for the controller’s configuration menu so I put “flat” buttons there out of necessity. I let them rest on a old bookshelf while I tried to discover a comfortable distance between them.
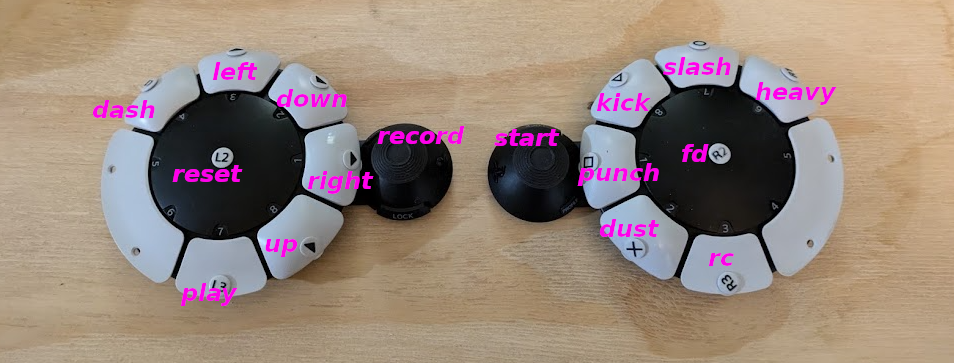
The “rounded-top” buttons were the clear winner for my purposes. The aren’t quite as conducive to “double-taps” as a traditional arcade buttons but are pretty good for piano-rolls. The “curved-side” and “extended-inward” style buttons had a tendency to come off if I pressed them too hard. Fortunately, each controller comes with 5 “rounded-top” buttons and eventually settled on using the “flat” and “double-flat” buttons to fill in the empty space. This gave me the tactile indicators I was looking for while still keeping the buttons functional for other profile settings. I also eventually rotated my bindings by a single button to better fit my hand positioning relative to the joystick.
While I’m on the subject of the PS Access buttons, my surprise favorite among them turned out to be the “center” one. I had originally bound this to “roman cancel” and noticed how easy the controller made it to time my red and purple cancels. You can do a couple forms of plinking between any of the “rounded-top” buttons to the “center” button. There’s a slide-input by quickly sliding your finger downward off any of the rounded buttons to the center one or you can reverse the inputs by piano-rolling from knuckle to fingertip.
After noticing the effectiveness of these techniques, I swapped my RC binding with my “faultless defense” button. This new tech ultimately opened up new defensive option-selects on Testament that helped me finally break into the Celestial floor. My current setup is illustrated below:
Once I felt confident with the placement, I started preparations for mounting them. I began by tracing out the controllers in my desired configuration on a sheet of cardboard. I cut out the traced regioned with an utility blade then duct taped it to a second peice of card board to form a basic frame. I spent a couple weeks playing on it like this just to ensure I was happy with the layout.
When it came time for mounting, I purchased a 3/4 inch sheet of plywood and 1 inch long #10-24 screws with a cone-shaped head. In order to accurately place them, I used a simple compass construction. Using the points where the joystick extents as a reference, I measured the distance to each of the two mounting points. After recreating the circles on my cardboard, the intersections gave me estimated drill points. The compass construction is illustrated below:
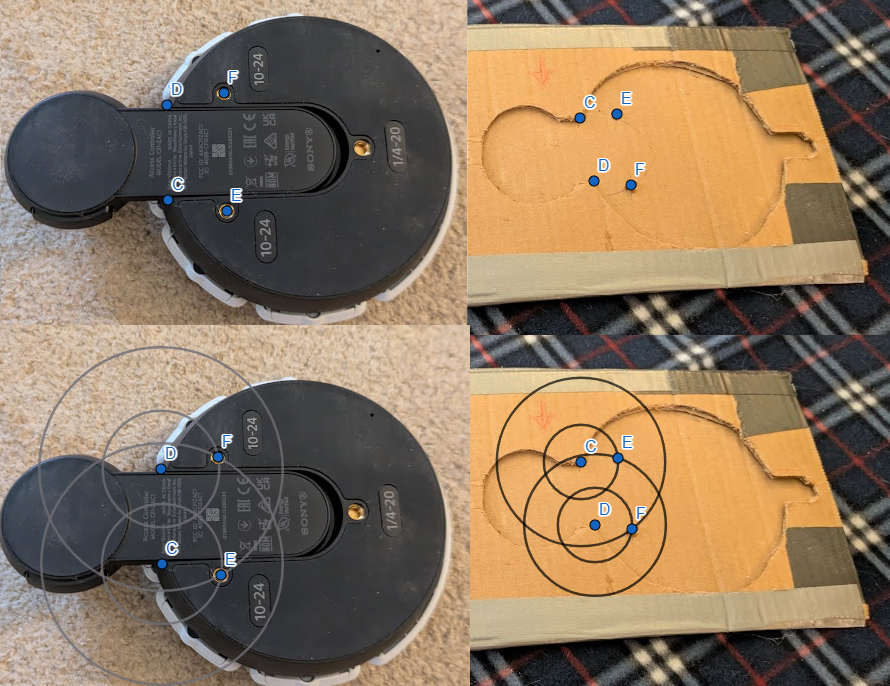
Before I actually drilled holes through the plywood, I did a quick check using the cardboard frame. I poked a hold through the marked points, inserted screw and tried to match them up with the actual controller. It turned out that drill points were highly accurate on one side but not the other. Fortunately, I was still working with cardboard instead of wood and was able to slowly tear it until it fit. The final step was using pencil to mark the plywood drill points through the holes in the plywood. I did this work slowly with a hand drill and gradually widened the holes as needed until the screws fit.
Overall, I’m pretty happy with how this came out. I’ve been playing on it for almost 3 years now, fairly intensely, and it outlived 2 Dual Shock controllers in the same time period. The wireless is good enough for single-player, but I felt like it will occasionally drop inputs in online play. Whether it truly does or doesn’t would require a double blind test, but at this point I only play ranked wired just to eliminate any unnecessary factors I could blame.
The switches are far from silent, but I appreciate the distictive click which sounds similar to the arcade stick and mechanical keyboard — perhaps slightly muted. It’s loud enough that I can hear the timing of my moves but not so loud that it overpowers the sound effects I’m listening for in a match. My cats were scared of it at first, but they don’t seem to mind it much anymore.
There’s certainly room for improvement in my setup. I’d love to add a pair of external buttons to replace the bindings I presently have bound on “joystick depress” — namely “start” and “select” (or whatever the PS5 equivalent icon is meant to be). I’ve found my controller setup to work fairly well with Tony Hawk’s Pro Skater 1 and 2 in addition to Guilty Gear Strive, but it would be nice to be able to use the joystick in certain situations without fear of accidentally pausing the game by pressing too hard. If you were planning to use a single PS Access competitively using the joystick, you might consider investing in a single external button to have a safe button for “start”.
Since I’m talking about other games, I’ve also adopted the the same HitBox-style key-bindings in Hades II to great effect. By assigning “space” to “up”, “s” to “left”, “d” to “down”, “f” to “right”, and “shift” to “dash”, I was able to greatly improve my “circle strafing” around certain bosses. It also opened up the possibility of using “a” and “z” for “summon” and “cast” without sacrificing movement ability.
There’s also some other considerations you’d need to have if you were going use this in tournament play. The PS Access controller allows some things that might be considered “cheating” depending on the title in question. For example, some tournaments ban assigning the same input to multiple buttons. It might be fair for your opponent to ask to inspect your bindings before a match in certain situations. I’d also come prepared with a USB hub and cabling to ensure you’re not monopolizing both ports. That’s just bad etiquette.
Overall, I’m extremely happy with Sony’s controller but being limited to the PS5 hardware is a significant trade-off to consider. I think Sony could have a great product here if there was better driver support for Windows, Linux, and other consoles. I also have some ethical concerns about how quickly they sold off EVO to the highest bidder while simultaneously starting to design new fight sticks. Perhaps Sony could benefit from open sourcing some of their driver code so that everyone can have “PS Access” and tournament organizers don’t feel locked in to a single vendor.
I really hope that Sony’s commitment to providing accessible gaming peripherals continues. Accessible product design is good for everyone.
If you’ve found this information helpful and have the means to do so, please pay it forward by contributing to the AbleGamers fund. They’ve been providing gamers with special needs with the tools to enjoy video games for decades now; I hope they can continue do so for many to come.
Let’s make the Fighting Game Community be as inclusive as we can!